

Google's Pixel phones are, in many ways, the cleanest place to use an eSIM. They run Android close to how Google designs it, the eSIM menus are straightforward, and support has been in the line for a long time. If you are heading abroad with a Pixel, you can almost certainly skip the physical SIM entirely and download a travel data plan in a couple of minutes. This guide covers which Pixels support eSIM, how to confirm yours in half a minute, how to install a GetSim plan the right way, and how to run your home number and travel data side by side without draining the battery.
Do Pixel phones support eSIM?
As a general rule, Google Pixel phones have supported eSIM since the Pixel 3. That means the Pixel 3 and 3a, the 4 and 4a, the 5, 6, 7, 8 and 9 families, along with their Pro and a-series variants, are built with an embedded SIM. On these phones you can run dual-SIM: your home number on a physical nano-SIM (where the model has a tray) and a travel eSIM as a second line, or two eSIMs together on the models that support that.
Pixels have generally been more consistent about eSIM across regions than some other Android brands, but there is no harm in confirming, and it takes seconds. A quick check also rules out any edge case with a carrier-locked or unusually configured unit.
Confirm your Pixel in 30 seconds
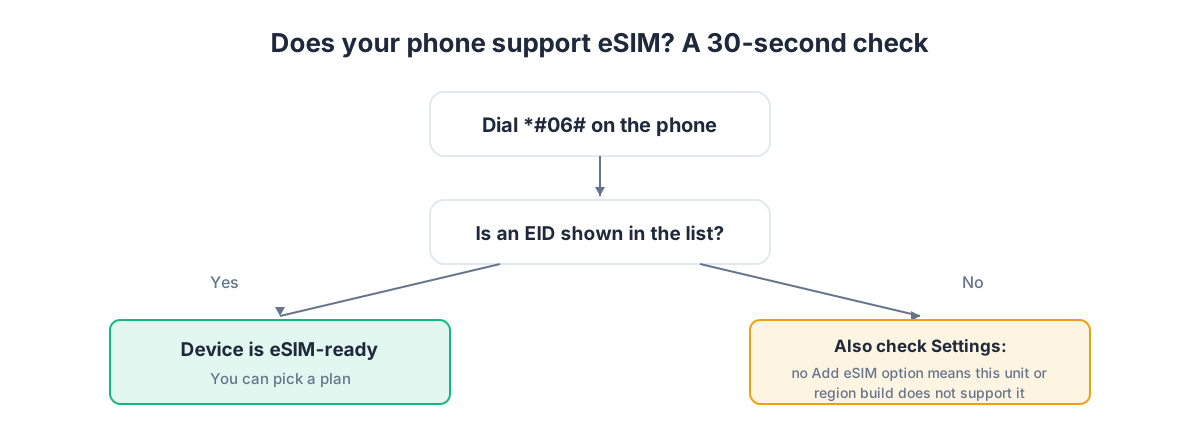
Two checks give a definitive answer:
- Dial *#06# on the keypad. If the panel includes an EID, a long identifier that only exists on devices with an embedded SIM, your Pixel supports eSIM.
- Open Settings > Network & internet > SIMs. If you see a + Add SIM or Download a SIM instead? option, the eSIM feature is live.
If both come back positive, you are ready to buy a plan. The EID is the reliable signal here because it is reported by the phone's own hardware rather than a spec page, which is why we lean on it for every device in the phone compatibility guide.
What a travel eSIM changes, and what it doesn't
Adding a travel eSIM does not disturb your existing SIM or your home number. It creates a second line. Your Pixel is dual-SIM, so it holds your everyday number and a travel data profile at once, and you decide which line handles calls, texts and mobile data. That is what makes travel cheap: your home number stays reachable for verification codes and messages, while all the data-heavy work runs over the local plan.
A GetSim destination plan is normally data-only. It gets your Pixel online in the destination country; it does not give you a local phone number for calls. For travel that is ideal, because maps, messengers, ride apps and translation all run on data and you call and text through your usual apps. If you separately need a real number that can receive an SMS, that is a virtual number, a receive-only rented mobile number that works on its own, independent of the data eSIM.
Buy the plan before you install
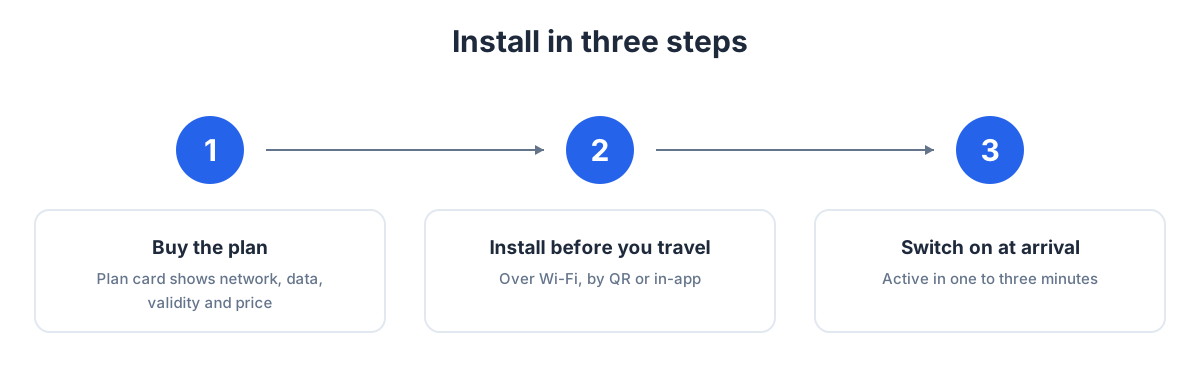
Purchase first, install second. GetSim covers 190+ destinations. Pick your country and the plan card shows the network, data allowance, validity window and price before you pay. If your trip crosses several borders, a single regional plan can cover the whole area instead of one eSIM per country.
One account and one shared prepaid wallet in the app run everything. Top the wallet up once and pull plans as you travel, trip after trip. Unused, unactivated plans carry a 7-day refund, so buying ahead of a trip that could still change is low-risk.
Installing a travel eSIM on Pixel, step by step
Pixel keeps this clean, and the menu wording rarely moves much between versions.
- Connect to Wi-Fi first. The profile downloads over the internet, so use home, hotel or airport Wi-Fi. A weak cellular link is the usual cause of a stalled download.
- Open Settings > Network & internet > SIMs.
- Tap + Add SIM, then Download a SIM instead? and scan the QR code from your GetSim order.
- Let the phone download and install the profile, then follow the prompts to activate it.
- Give the new line a clear name such as "Travel" so you can tell it apart from your home number.
- Set the travel eSIM as your mobile data line, and keep calls and texts on your home number.
- Turn on Roaming for the travel eSIM. A travel eSIM uses partner networks in the destination, which Android treats as roaming for that line, so this switch must be on or you will have no internet despite a correct install.
Install at home, activate on arrival
If your departure is coming up, install before you leave. The download works over any Wi-Fi, so do the whole setup at home the day before: add the eSIM, name it, set it as your data line, and leave Roaming for that line off until you land. On arrival, turn Roaming on and the connection comes up by itself, no airport Wi-Fi scramble required. For the concept from scratch, see what an eSIM is, and the cross-platform install guide compares iPhone and Android.
Managing two lines and saving battery
Dual-SIM can nudge battery use up because the phone maintains two connections. The fix on a trip is simple: set mobile data to the travel eSIM only, so your home line still rings and receives texts but stops chasing expensive roaming data in the background. Turn on Wi-Fi Calling for the home line as well, and you will keep getting calls and SMS to your usual number over any Wi-Fi at no roaming cost. That combination, home number reachable plus cheap travel data, is the whole setup.
Topping up and reusing your eSIM
Running low? Top up in the app without reinstalling. The profile stays on the phone; you just add data or extend validity on the same line. On your next trip, keep the line and load a fresh plan from your wallet, no delete-and-re-add needed.
Two eSIMs at once on newer Pixels
One nice trick on recent Pixel models is support for more than one eSIM stored at the same time, with two active together. In practice that means you can keep an eSIM for your home carrier and add a travel eSIM without any physical SIM at all, then switch the active pair in Settings > Network & internet > SIMs. For a frequent traveler this is tidy: your home line and your current destination plan coexist, and next trip you simply download another profile and swap which two are active. You do not have to delete anything to add a new plan, though clearing out old, expired profiles keeps the list readable.
Stretching your data on a Pixel
A travel plan has a fixed allowance, and stock Android makes it easy to protect. Open Settings > Network & internet > Data Saver and switch it on to block background data except for apps you allow. Under Settings > Network & internet > SIMs > App data usage you can see per-app consumption and rein in the heavy ones. Set Google Photos backup to Wi-Fi only, and switch Play Store auto-updates to Wi-Fi only, so a week of photos or a big app update never lands on your cellular allowance.
Streaming video and video calls are the biggest consumers. An hour of standard-definition streaming or a long video chat can take a real bite out of a small plan, so keep those for Wi-Fi and lower the video quality when you are on cellular. Download offline maps for your destination city in Google Maps before you leave Wi-Fi, and navigation will barely touch the plan. If you are unsure how large a plan to buy, our guide to how much data you need for a trip gives realistic figures by activity.
eSIM versus a local SIM card
Should you grab a local SIM at the airport instead? For a Pixel, rarely. The embedded eSIM lets you buy and install before you land, keeps your home number active in its own slot, and skips the kiosk queue and the risk of losing a tiny card. A local physical SIM only earns its place if you specifically need a local number for calls, which most travelers do not. For data alone, the Pixel's eSIM is quicker and lower-risk. If you are instead weighing this against your carrier's roaming plan, the eSIM vs roaming comparison lays out when each option makes sense.
Pixel eSIM: decision table
| Your situation | What to do |
|---|---|
| Pixel 3 or newer, traveling for data | Install a data-only travel eSIM; keep your home number for calls |
| Want to double-check your unit | Dial *#06# and look for an EID, then check Settings > SIMs |
| Multi-country trip | Choose a regional plan over one eSIM per border |
| Need to receive SMS on a real number | Add a receive-only virtual number alongside the data eSIM |
| Worried about battery on dual-SIM | Set data to the travel eSIM only and enable Wi-Fi Calling for home |
| Leaving soon | Install over Wi-Fi now, enable roaming for the travel line on arrival |
Pixel eSIM questions
Will a travel eSIM replace my current SIM?
No. It is a second line. Your existing SIM and home number stay in place, and you switch data between them in Settings > SIMs.
My Pixel is carrier-locked. Can I still use a travel eSIM?
A carrier lock ties the phone to your home carrier's network, so if your Pixel is locked you may not be able to add another operator's profile until it is unlocked. Most phones unlock once the contract terms are met. Run the *#06# check and try adding the eSIM; if the settings block it, contact your carrier about unlocking. An already-unlocked Pixel has no such restriction.
Do I need to remove the eSIM before selling my Pixel?
Yes, it is good practice. Before you sell or hand on the phone, delete any eSIM profiles in Settings > SIMs and factory reset, so none of your plans or accounts travel with the device to its next owner.
The eSIM installed but there's no internet.
Check that Roaming is on for the travel eSIM and that it is set as your mobile data line. Those two settings account for almost every "no connection" case.
Can I set it up before I fly?
Yes. Download over home Wi-Fi and enable roaming for the travel line on arrival. If your destination is Türkiye specifically, complete the final activation on arrival over local Wi-Fi.
Do I need a plan for calls?
Usually not. Apps handle calls and messages over data, and Wi-Fi Calling keeps your home number reachable. A data-only plan is enough for most trips.
Can I reuse the eSIM next time?
Yes. Keep the line and load a new plan from your wallet for your next trip, no reinstall required.
What happens when my travel plan runs out?
The profile stays on the phone; it simply runs out of data or validity. You can top it up from the app to keep using it, or load a new plan to the same line for your next trip. Nothing is wasted and nothing needs reinstalling.
Does a travel eSIM work on a Pixel a-series phone?
Yes. The a-series Pixels from the 3a onward support eSIM just like the flagship models. Run the same *#06# check to confirm your specific unit, then follow the same setup steps.
A quick pre-flight checklist
Run through this before you leave: confirm the EID with *#06#, buy your destination plan while you still have easy Wi-Fi, install and name the eSIM, set it as your data line, enable Wi-Fi Calling on your home number, and leave Roaming for the travel line off until you land. Doing this the evening before rather than at the gate means any small hiccup is solved on home Wi-Fi with time to spare. On arrival, switch Roaming on for the travel line and your Pixel connects within a minute, before you have even collected your bags. That is the whole appeal: the tricky part is done at home, and the destination just works.
In short
Every Pixel from the Pixel 3 onward supports eSIM, and a quick *#06# EID check confirms yours in seconds. Buy your destination plan first, install over Wi-Fi, set the travel eSIM as your data line, keep your home number for calls, and turn on Roaming for the travel line when you land. If you also carry an iPhone, our iPhone eSIM guide covers the same setup on iOS.
Ready when you are
Put this guide to use on your next trip
Travel eSIMs that install in minutes and keep your home SIM active.