
If you own a modern iPhone, there is a good chance the fastest way to get online in another country is already built into the phone in your pocket. No plastic card, no store visit, no borrowed paperclip to pop a tray. An eSIM is a data profile that downloads over the internet and activates in a couple of minutes, and Apple has supported it across the iPhone line for several generations. This guide explains exactly which iPhones can use an eSIM, how to check yours in under a minute, how to install a GetSim travel plan the right way, and the handful of settings that decide whether your trip starts with a working connection or a frustrating dead zone at arrivals.
Does your iPhone support eSIM?
As a simple rule, every iPhone from the iPhone XS, XS Max and XR onward supports eSIM. That covers the entire modern range: the XS/XR family, the 11, 12, 13, 14, 15 and 16 series, the SE models released after the first generation, and the Pro and Pro Max variants of each. If your iPhone is from that era, you can almost certainly load a travel data profile onto it today.
There is one wrinkle worth knowing. iPhones sold in the United States from the iPhone 14 generation forward are eSIM-only: they have no physical SIM tray at all. That is not a problem for travel data, it actually makes eSIM the only option, but it does mean you cannot fall back to a plastic SIM if you ever wanted to. Models sold in most other regions still include a nano-SIM tray alongside eSIM support, so you get both.
Rather than trust a model name, it is faster to ask the phone directly. Two checks settle it in seconds, and they are the same checks we recommend for any handset in our guide to checking eSIM support.
The 30-second check
Dial *#06# on the keypad. On an eSIM-capable iPhone this pops up a small panel of identifiers, and one of the lines is labelled EID: a long number that only exists on devices with an embedded SIM. If you see an EID, the hardware is there. As a second confirmation, open Settings > General > About and scroll down; a phone with eSIM lists an Available SIM or an EID entry there too. If both the dialer code and the About screen show an EID, you are ready to buy a plan.
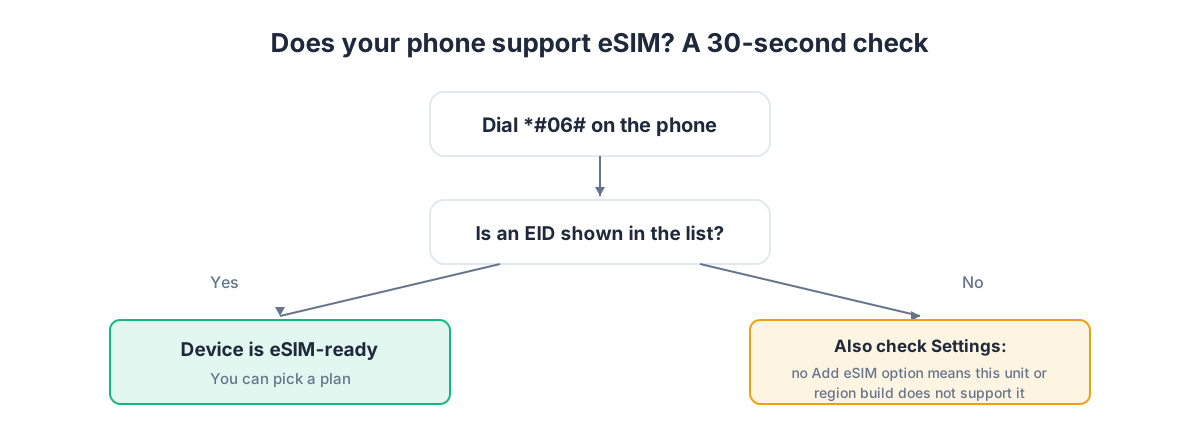
Why does the EID matter so much? Because it is the one signal that does not lie. Marketing pages, spec sheets and forum threads can be out of date or refer to a different regional variant, but the EID is printed by the phone from its own hardware. If the code appears, the embedded SIM exists. If nothing appears, no data plan will change that, and you would need a phone with a physical SIM instead.
What an eSIM does and does not change on iPhone
Installing a travel eSIM does not touch your existing SIM or your home number. It adds a second line. iPhones since the XS generation are dual-SIM: they can hold your everyday number and a travel data profile at the same time, and you choose which one handles calls, texts and mobile data. That is the whole trick to affordable travel. You keep your home number reachable for two-factor codes and family messages over Wi-Fi, while all the heavy data, maps, translation, ride apps, runs over the cheap local plan.
A GetSim plan for a destination is almost always data-only. It gives you mobile internet in the country you bought it for, not a new phone number for calls in that country. For most travelers that is exactly right: you message over WhatsApp, iMessage or Signal, you call over the same apps, and you never think about per-minute charges. If you specifically need a real number that can receive SMS, for a bank verification or a local listing, that is a separate product, a virtual number, which is a receive-only rented mobile number and works independently of your data eSIM.
Buying the right plan before you install
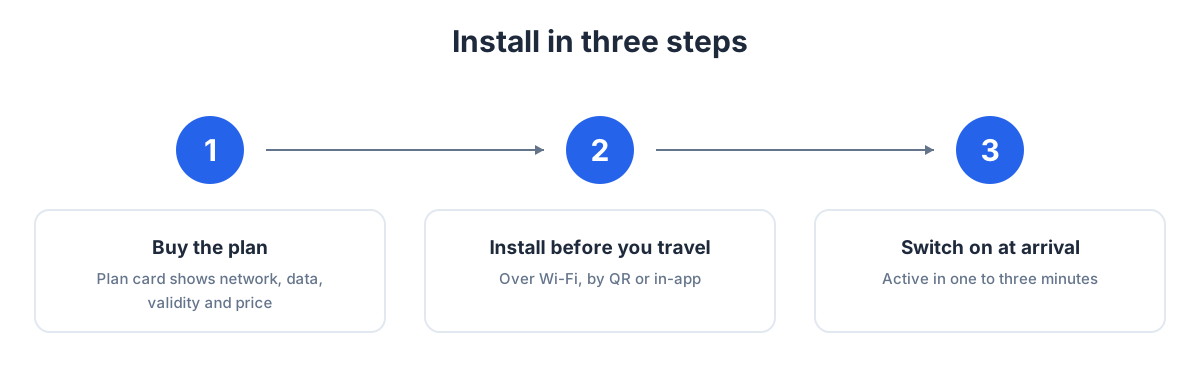
The order of operations matters. You buy the plan first, then install it, then switch it on when you land. GetSim covers 190+ destinations, so start by finding the country you are heading to. Every plan card shows you the network it uses, the data allowance, the validity window and the price before you pay anything, so there are no surprises after checkout. If you are visiting several countries on one trip, check the regional plans that cover a whole area on a single profile instead of buying one eSIM per border.
Everything runs from one account and one shared prepaid wallet in the app, so if you travel often you top the wallet up once and draw plans from it as you go. And because unused, unactivated plans are covered by a 7-day refund, you can buy ahead of a trip that might change without feeling locked in the moment you pay.
Installing a travel eSIM on iPhone, step by step
The install itself is short. The one thing that trips people up is timing and network, so read the note after the steps before you start.
- Be on Wi-Fi. The profile downloads over the internet, so connect to hotel, airport or home Wi-Fi first. A patchy cellular connection is the most common reason an install stalls.
- Open Settings > Cellular (or Mobile Service on some regional builds).
- Tap Add eSIM, then choose to add it via QR code or, on recent iOS, by entering the details manually.
- Scan the QR code from your GetSim order, or paste the activation details. The phone downloads and installs the profile.
- When prompted, give the new line a clear label such as "Travel" so you can tell it apart from your home line.
- Choose your default line settings: keep your home number for calls and texts, and set the travel eSIM for mobile data.
- Turn Data Roaming ON for the travel eSIM only. This sounds counter-intuitive, but a travel eSIM connects to partner networks in the destination, and iOS treats that as roaming for that profile. Leaving it off is the single most common reason a correctly installed eSIM shows no internet.
Install at home, switch on abroad
Here is the timing detail that saves trips. The download and install can happen anywhere you have Wi-Fi, so if you are already abroad, install at home before you fly. Do the whole setup the night before departure: add the eSIM, label it, set your data preference, and simply leave Data Roaming for that line off until you land. When you arrive, flip Data Roaming on and the connection comes up on its own, usually within a minute of leaving airplane mode. You never have to hunt for airport Wi-Fi with your bags on your shoulder. New to the whole idea? Our explainer on what an eSIM is walks through the concept from scratch, and the general install guide covers Android too.
Managing two lines without the battery drain
A dual-SIM iPhone can occasionally use a little more battery because it is maintaining two connections. There is an easy fix for a trip: turn your home line to data-off. Go to Settings > Cellular, select your home number, and switch Turn Off This Line for data, or simply set the travel eSIM as the only line providing mobile data. Your home number still receives calls and texts when it has signal or over Wi-Fi Calling, but it stops actively searching for expensive roaming data in the background.
Wi-Fi Calling is the other setting worth enabling before you go. With it on for your home line, you can receive calls and SMS to your usual number over any Wi-Fi, including the hotel network, at no roaming cost. Combined with a data-only travel eSIM, that is the complete kit: home number reachable, travel data cheap, nothing left to chance.
Topping up and reusing your eSIM
If you run low, you top up from the app without reinstalling anything. The profile stays on the phone; you just add data or extend validity to the same line. That also means a returning traveler can reuse the same eSIM slot: install once, and on your next trip load a fresh plan to the wallet and assign it. There is no need to delete and re-add profiles every journey unless you want to clear out old ones.
Making the data last on iPhone
Since a travel plan has a set allowance, a few iOS habits stretch it a long way. Open Settings > Photos and pause iCloud Photos sync while you are away, or set it to sync only on Wi-Fi, so a week of holiday snaps does not quietly upload over your travel data. In Settings > App Store, turn off automatic app downloads and updates on cellular. Enable Low Data Mode for the travel line under Settings > Cellular > Cellular Data Options; it tells apps to hold back on background refresh and high-resolution streaming. And download your maps for the city offline in Apple Maps or Google Maps before you leave the hotel Wi-Fi, so navigation barely touches the plan.
Streaming video and video calls are the two biggest consumers. A short video call or an hour of standard-definition streaming can eat a meaningful slice of a small plan, so save the long catch-up calls for Wi-Fi and drop streaming to a lower quality when you are on cellular. If you routinely misjudge how much you use, our guide to how much data you need for a trip gives rough working figures by activity so you can size the plan sensibly rather than guessing.
eSIM versus a physical travel SIM
Travelers sometimes ask whether to grab a local SIM at the airport instead. The eSIM wins on convenience for a modern iPhone. You never queue at a kiosk, never swap out and risk losing your home SIM, and never fumble a tray in a taxi. You buy and install before you even land, and your home number stays active in its own slot the whole time. A physical local SIM can occasionally make sense if you need a genuine local number for calls, but for pure data on an iPhone, the embedded eSIM is simpler, faster and harder to lose. If you are weighing this against just turning on your carrier's roaming, the eSIM vs roaming comparison lays out the trade-offs.
iPhone eSIM: quick decision table
| Your situation | What to do |
|---|---|
| iPhone XS or newer, traveling for data | Install a data-only travel eSIM, keep home number for calls over Wi-Fi |
| US iPhone 14 or newer (eSIM-only) | Same setup; eSIM is your only option and it works perfectly for travel |
| Not sure if your model qualifies | Dial *#06# and check for an EID before buying anything |
| Visiting several countries | Consider a regional plan instead of one eSIM per country |
| Need to receive SMS on a real number | Add a receive-only virtual number alongside your data eSIM |
| Already abroad next week | Install now over home Wi-Fi, enable roaming for the travel line on arrival |
Common iPhone eSIM questions
Will installing a travel eSIM delete my normal SIM?
No. It adds a second line. Your physical SIM or primary eSIM stays exactly as it was, and you switch between them in Settings whenever you like.
My eSIM is installed but there is no internet. What is wrong?
Almost always one of two things: Data Roaming is off for the travel line, or your default mobile data line is still set to your home number. Check both in Settings > Cellular.
Can I install the eSIM before I leave home?
Yes, and you should. Download and install over Wi-Fi at home, then just enable roaming for that line when you arrive. Only remember that if your trip destination is Türkiye, the final activation has to complete on arrival over local Wi-Fi rather than from inside the country.
Do I need a plan for calls?
Most people do not. Calls and messages go over apps on the data plan, and your home number still receives calls over Wi-Fi Calling. A data-only plan is enough for the vast majority of trips.
Can I reuse the same eSIM on my next trip?
Yes. Keep the line, and load a new plan from your wallet next time. No reinstall needed.
The short version
Any iPhone from the XS generation onward is eSIM-ready, and the only check you truly need is the EID that appears when you dial *#06#. Buy the plan for your destination first, install it over Wi-Fi, label the line, set the travel eSIM for data and your home number for calls, and turn on Data Roaming for the travel line when you land. Do that and you walk out of the airport already online. When you are ready, browse plans for your destination and set it up before you fly. If your next phone is an Android, our Galaxy S eSIM guide covers the same ground on Samsung.
Ready when you are
Put this guide to use on your next trip
Travel eSIMs that install in minutes and keep your home SIM active.